Tuesday, July 31, 2012

Afternoon fun...

There is a river on the property that served as our afternoon cool down and entertainment.  
(Sorry mom, you don't have to watch the first one.)


Monday, July 30, 2012

Finca Fun

Here's all the random pics from the farm that we didn't have time to upload the last 4 weeks. 

Kyle found baby bunnies behind the intern house. 
Guanabana or custard apples as they were called in India. A huge fruit that is sweet and has the consistency of custard. You can eat it with a spoon. 
Son grande. They're huge.
A sloth in the front yard. Kyle touched it. 
Papaya
Miller...Marcelino's 8 month old puppy. 
Marcelino.
Manu building the hen's laying box.
Pedro grinding coffee.
A painting in the intern house.

John wanted me to paint two cabinets.

And in his living room.


Soy Pedro.


Okay folks, this post is EXTRA special. “Why is that?” you ask…well it’s because I am writing it. And, who am I? Pedro, of course! My name is Pete (AKA Pedro), and I have been volunteering with Kyle and Nea on La Finca Los Perezosos, and I’d consider myself the seasoned veteran of the bunch (One and a half months and still going, baby!) But enough about me, and onto the important stuff. (Sorry for the absurd length of this post, but bear with me because its really cool stuff!)
Pedro y Marcelino

Over the past few days, Kyle and I have helped Marcelino in building what the campesinos call a “bollo” (pronounced “Boy-O”, a type of “house” made only from materials available in the lush forest that surrounds us.) Originally, the average campesino family would use this type of construction. A bollo provides cool shade and ventilation during the hot days, and stays relatively warm during the cooler nights. To avoid attacks from tigers, the entire family would sleep in a loft area (about 8 ft above the ground) just below the roof of the bollo. They would use dry, hollowed-out gourds for taking care of “potty business” during the nights, ensuring that there was no reason to descend to ground level during the dangerous tiger-infested evenings. 

The bollo that Me, Kyle, and mostly Marcelino built was for a different kind of “family”. This “family” I speak of consists of 28 hens and 1 lucky rooster, all of whom desperately needed a new home. After harvesting a myriad of trees of different species, lengths, and girths, we were ready to commence construction. So…we began with 4 posts (simple enough, right?). These posts, along with the majority of the other wood that we collected, Marcelino explains, are specific species of woods that are especially resistant to termites and are very durable. Then, four lintels are used to connect the four posts and are nailed into place (Marcelino explains that most campesinos use fiber from tree bark in place of a hammer and nails, as they don’t have access to such tools). We then place two temporary posts into the ground, each with a “Y” at the top, to hold the beam that will eventually become the peak of the roof. Using only a hammer, nails, and of course our machetes, we construct a basic framework for the bollo using our menagerie of harvested woods. 
The structure is taking form


The frame is almost done.
“What now?” Kyle and I are thinking. Well, Marcelino has already climbed a Royal Palm and chopped down a sufficient amount of palm fronds, which will be used to construct the roof. The only catch is, the fronds are a far cry from the construction zone, and so we much carry them from the jungle to the chicken coop. You may be thinking, “Carrying palm fronds can’t be that difficult” but allow me to let you in on a little secret…it is that difficult. Carrying a good-sized Royal palm frond is no easy task; and carrying two to three of them at a time (or five, if you are Marcelino) makes it that much harder. After dragging them to the desired location, you must slice each leaflet of the palm frond right at the “bone” of the frond, and then bend both sides of leaflets to that they dangle downwards, and then they are ready to become roofing “shingles” (if you will). 


The fronds are then laid on the framework, one at a time, and are secured into place in three different places using fiber from the bark of a specific tree. The fronds are layered similar to shingled siding, each frond overlapping upon the next. Each side of the roof required about 15 overlapping fronds, cut in such a way that the roof has a subtle taper (wider at the bottom and just a bit narrower at the top).  


The roof is not finished, however. The sharp-angled roof still leaves the sides open. The sides of the bollo are finished in a similar way, with palm fronds secured in three places, but they require a much sharper taper to follow the angle of the roof. 


We tied the whole thing together with a tin-covered awning, assembled from miscellaneous bits of tin used for other building projects in the past. Inside of the bollo, about 6+ feet overhead, we created a roosting area for the chickens by placing long skinny sticks in various directions and heights across the lintels, with one big branch acting as an access ladder. And that’s how to build a bollo.


 Another volunteer, Emmanuel, built a wonderful set of “chicken-boxes” where the hens can relax and lay eggs in a comfortable private environment. This place is like a 5-star hotel for chickens!


So, I hope I didn’t get too carried away with talking, and kept your attention to the best of my abilities. But more so, I hope my hens are happy so I can enjoy dozens of fresh eggs for breakfast every week. Lynea and Kyle (AKA Lynyle) give their best, as do I. Hope you enjoy the photos and videos!
Pedro Picapiedras

Marcelino el jefe. Marcelino the boss.

We got to work with and learn from a guy named Marcelino for one month on the Lazy Man's Farm here in Panama. Marcelino has an incredible knowledge about things on the farm and he wields the machete like a boss. And well, he was our boss for the past month, and I can tell ya, we learned a ton from this awesome dude. He has a great sense of humor and a good attitude. Here's an interview in Spanish that we did with him the other day. I translated it roughly below. Enjoy.

Kyle: This is our incredible boss, Marcelino. He knows everything about the farm. So, we’re gonna have an interview with him.

First, How did you end up living and working here?

Marcelino: First, it’s a pleasure to share what I know with you, the volunteers. We’ve had many volunteers and I really enjoy teaching them all.

So, I came here because I knew a little about the land, and I did this kind of work for 2 years before John bought the land.

So I came looking for work here. But I knew nothing. Everything I’ve learned, I’ve learned here working here on the farm. And now I like to teach, in the same way that I’ve been taught.

Kyle: So you almost went to Panama City for work right?

Marcelino: Yeah, in the beginning I thought life would be better in the city, because that’s what most farmer’s around here think, and they abandon the farm life.
But now, on the contrary, I prefer life here. Everything is more quiet and relaxed and I can harvest my own food, which you can’t do in the city. You only have the supermarket.

Kyle: What do you like best about working in the farm?

Marcelino: One of the things I like best is to work with volunteers (Kyle smiles an approving smile) and doing work that they really like and want to learn about.
It’s good when they can see the differences they make on the farm.

Kyle: This guy really is a good teacher and we’ve learned a lot.

What are some other things you’ve learned here?

Marcelino: Other things are how to improve the soil each day, and in the vein, I’ve learned how to make better compost which is most important.
And then a little bit of everything for daily life like construction, plumbing, electricity, welding. I’ve learned many things here. And really, I thank John for having the patience to let me learn everything, although it’s really for his benefit (laughing), but also for mine for when I’m on my own in the future.

Kyle: But you also have some patience for John as well (haha).

So, what are some of your goals for the future?

Marcelino: One of my goals, when things are a little more stable in my life, in maybe 2 to 5 years, I’d like to have my own farm. A farm even better than what we have now, more focused, or maybe a little more organized. With more animals and also more methods that the local farmers can learn from and copy.
Kyle: And also to have a yuca that’s 100 pounds!

Marcelino: Yes, but actually to have one that’s 150 pounds!

Kyle: And also to jump from the cliff into the river.

Marcelino: Yes!

Kyle: Cool, thanks for everything. we learned a lot here and are really grateful.

Marcelino: Thanks for visiting us!

Friday, July 20, 2012

Things I like and don't like about living on a tropical farm in a tent...


I like looking at the stars as I go to sleep. Sometimes they fall down.

I like the rhythm of going to sleep to a symphony of frogs and waking up to a chorus of birds.

I like waking up to pee under the moon.

I don’t like all the bites I get when I wake up to pee.

I don’t like when it rains in the middle of the night and I have to wake up and put a cover over our house (tent).

I like the feeling when the cover is on my house and I’m back inside falling asleep to the rain. Sounds nice.

I don’t like when it rains too much and the floor of our house and bed get wet.

I like having a pick-the-tropical-fruit-off-the-tree buffet everyday. Yes!

I like watching birds.

I like that my days have time in them to look at the birds. Someone important said to do that.

I like feeding the chickens.

I don’t like that the chickens aren’t laying many eggs. What to do?

I don’t like that while I was writing this I had to run through the rain and put the cover on the tent. I got drenched.

I like that the things I don’t like are pretty fun anyway.

I like gathering a salad each day from all of our perennial spinaches, berries and fruit.

I like that I know what perennial means now.

I like working with Marcelino. He knows a lot and he speaks Spanish slowly.

I like working and sweating.

I like the daily routine of jumping off the cliff and swimming in the river after work.

I don’t like the smell of my work clothes that usually get worn a few times before being washed.

I like using a machete for almost everything.

I like Lynea.

I like climbing a mango tree and noticing a sloth right beside me (happened the other day).

I like that our shower is outside. It’s fun to watch the sunset while showering.

I like taking a cold-water shower after a hot day of work.

I don’t like taking the cold-water shower at night when it’s cooler.

I like learning about the stuff that gives us life: foods, plants and animals.

I like the idea of sharing what we’re learning with other folks someday.

I like using the compost toilet:
A.    cause the room is made of bamboo and you get a nice breeze flowing through
and B. cause I feel good about my deposit being useful for something

I like walking around barefoot when I get the chance to.

I don’t like stepping on thorns. Someone smart thought of shoes.

I like Panama and living on a tropical farm…in a tent.

Friday, July 13, 2012

Microgreens....yum!!!

For all my foodie friends, whether nutrient seekers like Kenna, veg/vegan like Britt and Nikki, a gourmet chef like Anne and April, or one like Greenhouse Tavern but can't afford it on a regular basis ..these are for YOU!!!!!

grilled beef tataki with crispy wonton and asian microgreen salad

Smoked Salmon, Poached Egg and Micro Greens


Microgreens: a Guide to Growing Nutrient Packed Greens
By: Eric Franks and Jasmine Richardson


WHY GROW MICROGREENS?
  • Minimal money, time, space needed
  • Fresh greens all year
  • Extremely nutritious
  • Strong dose of digestable:          
    • Vitamins
    • Minerals
    •  Phytonutrients
  • Concentrated nutrients
  • GREAT project for kids because you can see growth after 2-3 days!!!!
  •  Fantastic addition to any meal to give it that gourmet touch…and lots of nutrients.
SPROUTS vs. MICROGREENS vs. BABY GREENS

  • What is a sprout?
    • First stage in a seed’s development.
    • Means germination
    • Slightly opaque and crunchy texture


  • When does it become a microgreen?
    • Second stage in development
    • Establishes roots
    • Opens first leaves called cotyledons
    • Most nutritious stage
  • When does it become a baby green?
    • Tender leaves that are usually the spring mix we buy at the store
    • More flavorful and tender than a full grown head of lettuce
    • Lost some of the intensity in flavor and nutritional value of the microgreen
 
WHAT YOU NEED
  • 20x10-inch black plastic trays (about $2, but ask a nursery if they are throwing any away)
  • Soil
    • potting soil that is organic including things like worm castings, bat guano, compost etc.
    • In addition, potting soil that includes ingredients derived from the ocean such as kelp, crab meal, and shrimp meal is even better.
    • Ask the shop keepers
  • Soil Press
    • After filling your trays you need to cut a piece of cardboard into the shape of the tray to create a flat seed bed.
  • Seeds
    • Keep them cool and dry
    • Away from fluctuation in temp and moisture.
    • After planting the seeds, cover with a paper towel or a thin cotton cloth to keep the seeds warm and moist until they germinate.
  •  Lid
    • The amount this will help in germination is worth the extra money. Ask the nursery about plastic lids.
10 STEP HOW TO:
  • Step 1: Filling tray with soil
    • Fill the trays with about an inch to an inch and a half of soil.
    • Level out the soil with your hand
    • Use your soil press to flatten the soil but not compact it
  • Step 2: Sowing your seeds
    •   Take a small pinch of seeds with fingertips and sprinkle them over your tray.
    • Take your time to evenly spread them.
    • You can do one type per tray or make a mixed tray for more variety. If you mix them, use seeds that can be harvested at the same time.
  • Step 3: Covering your seeds
    • Cover with paper towel or very thin layer of soil. Paper towel keeps it warmer and moister.
    •   Keep the towel moist (not wet) until germination
  • Step 4: Initial Watering
    • Water your trays on a light spray setting so the whole tray gets gently soaked. (yes over the towel).
    • Your first water is the only time you can’t over water them. After this however, be aware they can drown.
  •  Step 5: Cover with Lid
    •  Cover with a lid if you are not growing in a green house. This will speed up the germination process by holding in heat and retaining moisture.
    • Keep in mind the germination process does not need light. Keep anywhere you would like where they can stay warm and moist.
  •   Step 6:  Watering your germinating seeds
    • Water only so the towels are moist.
    • You want your seeds to stayed covered until they are fully germinated, the towel method is great because it allows you to look at the process by lifting up a corner to check.
    • After a few days you will notice that the towels will have started to lift off the soil, giving you a hint that your greens are growing.
  • Step 7: Finding a good spot to grow
    • Now they need light. Find a sunny spot inside or outside for them to grow.
    • Depending on the type of seed (some like full light or part shade)
    • A sunny windowsill, porch ledge, or your front step
  • Step 8: Maintaining your growing greens
    • You can now remove the towel and plastic lid. If growing inside, you can flip the lid over and place underneath the tray to keep counters dry, but be sure to empty the water daily so that your soil isn’t in standing water.
    • Depending of the type of seed, it will need 7-14 days of light.
    •   Be sure all of the soil is wet…put your finger in the corner of the tray to be sure it is moist all the way down.
    • Watering once a day is usually sufficient…but don’t over water!
    • Overwatering will drown them, under watering them will wilt them. In that case, water a little more and they’ll come back to life.
  • Step 9: Harvesting
    • You can harvest right after their cotyledons open (first leaves) or wait for the second set (true leaves) of leaves to come.
    • If you leave them longer (to baby greens) they will start to rot because of how densely they are sown and the little soil
    • Harvest by cutting at the base with scissors. Grab a section loosely in one hand while cutting with the other.
    • Harvest as much or little as you want.

  •   Step 10:  Washing and Storage
    •  Rinse in cold water. Fill a large bowl, submerge greens..the seed hulls, seeds, duff, and damaged leaves will generally float to the top and you can skim them off with your hand.
    • Dry
    • Store in a Ziploc with a little air in it in the refrigerator.

 
TYPES
  • Random list of varieties:
    •  Amaranth
    •  Arugula
    • Basil
    •  Beet
    •   Broccoli
    • Purple Cabbage
    •  Celery
    •   Chard
    • Cilantro (Coriander)
    • Cress
    •   Endive
    •  Mustard
    • Pac Choi
    • Pea
    •  Radish
More info on microgreens: 

Fresh Origins - See also the microgreen's facts tab


Perennial Vegetables...


I wrote these notes for my dad also which is why it focuses on perennial vegetables that can grow in the colder climates. Sorry Florida. 


Perennial Vegetables  By: Eric Toensmeier

WHY?
  • Perennial means recurrent…so you plant this once and it keeps producing food year after year after year. 
  • Think rhubarb. It’s always there every year.
  • Some thrive in full shade (so you can utilize the space under your tree)
  • Some thrive in poor or waterlogged soils
  • Some will grow in your water garden
  • Plant some perennial vegetables, including edible trees, shrubs, and vines, and in a few years you can become a forager in your own backyard Garden of Eden!
TYPES
  • Here’s a bunch that will grow in Cleveland!!!
  • * = it sounded more interested than your average vegetable
  • ****  = I would definitely plant this!
    • Arrowhead
    • Multiplier onion
    • Ramps
    •  Perennial onions
    • Lovage
    •   *Water celery
    •  *Skirrete
    • *Udo 
      • warning!!! Must be processed (boiled in salted water or soaked in water with vinegar) before eating raw
    • * Chicory aka Dandelion 
      • yes the dandelions in the front yard are edible!
    • Sunchoke
    • Fuki
    •   Scorzonera
    •  Turkish Rocket
    • Sea Kale
    •  *Watercress
    • *Yams
    • ****Fiddleheads: ostrich Fern
    •  Groundnut
    •  Chinese Artichoke
    •  Asparagus
    • Camass
    •  ****Day Lily
      • buds used like green beans
      • flowers can be put in salads, as garnish, or battered and fried
      • young leaves cooked taste like creamed onion
      •   too much at once can be toxic
    • Giant Solomon’s Seal
    • ****Cranberry Hibiscus
      • This one can only be grown as an annual but it’s freaking delicious
    • *Musk mallow
    • *Fragrant Spring Tree
    • *Sorrel
    • *Linden tree
    • Stinging Nettle
      •  Rich in vitamin A, C, iron, magnesium, calcium, potassium, fiber
    • ****Garlic chives
    • Wild hyacinth
    • Jinenjo
    • Most fruit trees/plants 
      • Fruits that grow up north are usually perennials like strawberries, grapes (got an empty fence?? grow concords!), blueberries, apples, peaches, blackberries, raspberries, and pears can all grow in Cleveland
For more info on Perennials visit: 

Worms Eat My Garbage....

The next few posts will be my notes on books I've been reading here at the Lazy Man's Farm. 

Vermicomposting....the process of having redworms and other decomposer organisms process organic waste (your food scraps) and turn it into a great natural fertilizer that can be used in your gardens. 


Worms Eat my Garbage  By: Mary Appelhof 
This book is very easy to read with great pictures and diagrams. When we decide to have worms, I will definitely buy this book to get me started! Here are my notes on the first half. I wrote this out originally for my dad to get him interested and then realized it's so easy all of you could do it too!  

WHAT YOU NEED
  •  Box or container
  • Worms
  • Controlled environment
  • Bedding and garbage
WHAT WORMS NEED
  • Temperature
    •  Ideal is 59-77 F
    •  As low as 50
    • Below freezing and above 86 will kill them
  •  Moisture
    •  Standing water in the bin will drown them
    • They breathe through their skin which needs to be moist
  • Acidity
    • Ideal level is pH5-pH9
    • Too much acidic food is like pouring vinegar on them
  •  Ventilation                       
    • Worms use oxygen like us. They need proper holes to breathe.


GENERAL VOCABULARY
  • Castings
    • manure
  • Vermicompost
    • Contains castings
    • Contains partially decomposed bedding and organic waste from the food you add (bits an pieces of the food may be visible)
    • Contains worms of all ages and cocoons.
  • Vermicast
    • What is let after the worms digest and redigest everything a few times over.
    •   Very smooth texture
    • Considered overworked and has lost nutrients


WHERE TO PUT THE BIN
  • Patio
  • Shed
  • Basement
  • One person even made a coffee table for the living room with the worms inside
  • Behind the shed, but it would need to be insulated for winter.

 BOX OR BIN
  • Shape
    •  Must have holes in sides, top, and bottom and covered with mesh.
    • Or a rectangle cut from each side, top and bottom covered with screen/mesh
    • Shallow…12-18in deep- the worms feed up so you need more surface area. More surface area means more air in the bedding and more surface to place the waste.
  • Size
    • Keep track of how many lbs of waste you average per week over a few weeks. Food scraps, moldy food, etc.)
    • You wants 1 sq. ft. of surface for each pound of garbage per week.
    • Exampls: if you have about 5 lbs of waste a week you could use a bin that is 1’x2’x3’ (5’ surface area and shallow)
  • Material
    • Wood
      • Breathes
      •  Always damp so it deteriorates quicker (maybe 2-3 years)
      •  You can add a good finish like poly.
      • You can use plywood, old boards, or old drawers.                       
    •   Plastic
      • Requires more holes           
      • Accumulates moisture
    • Already made units
      • The Original vermicomposter
      • Gardener’s Supply Worm Bin
      •  Can-O-Worms
      • Worm-A-Way
BEDDING
  • Needs to be
    • nontoxic
    • light and fluffy so that there is air exchange and so no anaerobic conditions begin (no oxygen)
    • Some form of cellulose –carbon source to provide energy to the organisms that break it down.
  • You can use
    • Shredded newspaper – non color
    • Leaf mold – the bottom layer of decaying leaf pile (maple is preferable to oak)
    •   Animal manure – horse, rabbit, cow)
    • Hardwood chips
    • Peat moss

ADDITIONS TO BEDDING (optional)

  • Soil
    • Add only a handful or 2 of soil when preparing the bedding for grit which aids in breaking down food particles in worms gizzards.
    •  Soil will introduce other bacteria, protozoa, and fungi that aid in composting process
  • Calcium carbonate - Limestone powder
    • For grit
    • Keeps conditions alkaline
    • Provides calcium
    •  Stuff use to line soccer fields
    • Or pulverized egg shells do the same
    • Don’t use slaked or hydrated lime.
 KIND OF WORMS
  • You can’t use night crawlers
    • They don’t process large amounts of organic material like the composters.
    •  They don’t reproduce in confinement,
    •  And they won’t thrive in a bin if you dig around and mess up their burrows. 
  •  RED WORMS
    • Are best.

For more info on worm composting visit these sites: 


Finca De Los Perezosos...The Lazy Man's Farm

This one is a long one. We have to cram all we've learned in the first 2 weeks here into one blog. Our internet is very limited so it has taken me 8 days not to put this together. And we've already learned so much more since I started this one!!!

For the month of July we will be living in our tent on Finca de Los Perezosos - The Lazy Man’s Farm - owned by John Douglas. The farm is about experimenting with permaculture (stands for "permanent agriculture") in a tropical climate.

The goal of the farm is to educate other campesino’s (local small scale farmers) who mostly use traditional slash and burn methods that are very unsustainable. Slash and burn means they clear-cut the area that they intend to farm, and burn it in an effort to rid the area of debris. Burning all of this excess material causes the soil to lose the majority of its nutrients and the resulting ash can blow away easily and/or wash away with the torrential rain. As a result of the loss of nutrients, farmers need to fertilize the soil, often with harmful chemicals.


One method that Marcelino, the super-cool Panamanian farm manager, and John implement and preach is called ‘chop and drop.’ It is exactly what it sounds like; the chopping of dry or dead leaves and branches and/or branches of the balo tree (an rapidly-growing nitrogen fixer) and the dropping of this organic material in a circle around the drip line of the food producing trees/plants, such as citrus, avocado, star fruit, papaya, etc. This organic material that is being "chopped and dropped" is a form of continuous compost, and the material will provide essential nutrients (carbon, nitrogen, phosphorus, etc.) directly to the roots of the tree, which results in a healthier happier plant that produces an incredible abundance of food.

The farm is more of an experiment than anything…John does not sell food, nor does he make any money. It by no means perfect, but John and Marcelino gained essential knowledge from their trials and tribulations. The ultimate goal is to teach others to farm sustainably and, in a sense, to imitate nature. When you observe nature (untouched/raw nature, like a forest or jungle) there are no monocultures (crops containing only a single plant). There is incredible diversity. The jungle contains a forest floor, an understory, and a canopy. Each level is home to different species performing different, but equally important, tasks.

Most importantly, permaculture focuses on the essential relationships between diverse plant species. There is much more to permaculture than just planting food for eating. Yes, some plants are for harvesting food, but just as many (if not MORE) plants are there for support (fixing nitrogen, accumulating nutrients in the soil, providing shade, keeping away pests, etc.). If done correctly, one can plant an entire area just once, and, after a few years of care, this area will never need maintenance, as nature would take it’s course and leave only the harvesting to the farmer (this is the idea behind a "food forest"). The idea is to reduce the work that you do to the land, and increase the work that mother nature does naturally. No tilling. No plowing. No clear cutting. Only Permaculture! 

Enjoy the random pics and video's!!! 


Funky bugs. 

Nuestra casa. Our house. 2 weeks so far and only one flood. Well...not flood, but really really wet time in which we had to evacuate all of our stuff. Fun! 

Mariposa grande. Big butterfly. 

One of the tilapia aquaponic ponds. 

One way to dramatically reduce your weeding....cover the ground with cardboard to smother the weeds around the plants. 

Kimmy (another volunteer) harvesting a yuca. Yuca is a large root vegetable similar to a potato but much larger with a smoother, sweeter texture. A Panamanian staple. My favorite way to eat yuca is still from Diogo's mom. Her yuca is the best and I have yet to replicate it. 


A cliff on John's property that Kyle and Pete (another AWESOME volunteer) have been perfecting their front flips and gainers on. Mom, you'd have a heart attack. Much scarier than watching me dive into a nice cliff-and-rock-free pool. Don't worry, it's deep with a sandy bottom. 

Marcelino breaking the outer shell off the coffee bean to prepare for roasting. 

Chop and drop baby! 

Mixing compost....compost has many similarities to chili or spaghetti sauce recipe. Everyone has a favorite ingredient list, usually including a balance between nitrogen and carbon, water and oxygen, green and brown organic matter. This compost happens to be made largely of chicken poo, with a little ash, brown/dry banana leaves, and used sugar cane (called sugar cane bagasse, after the juice has been squeezed out).

Our outhouse, housing the composting toilet.

How to use the composting toilet

The camode. Super cool, super clean, super non-smelly. 

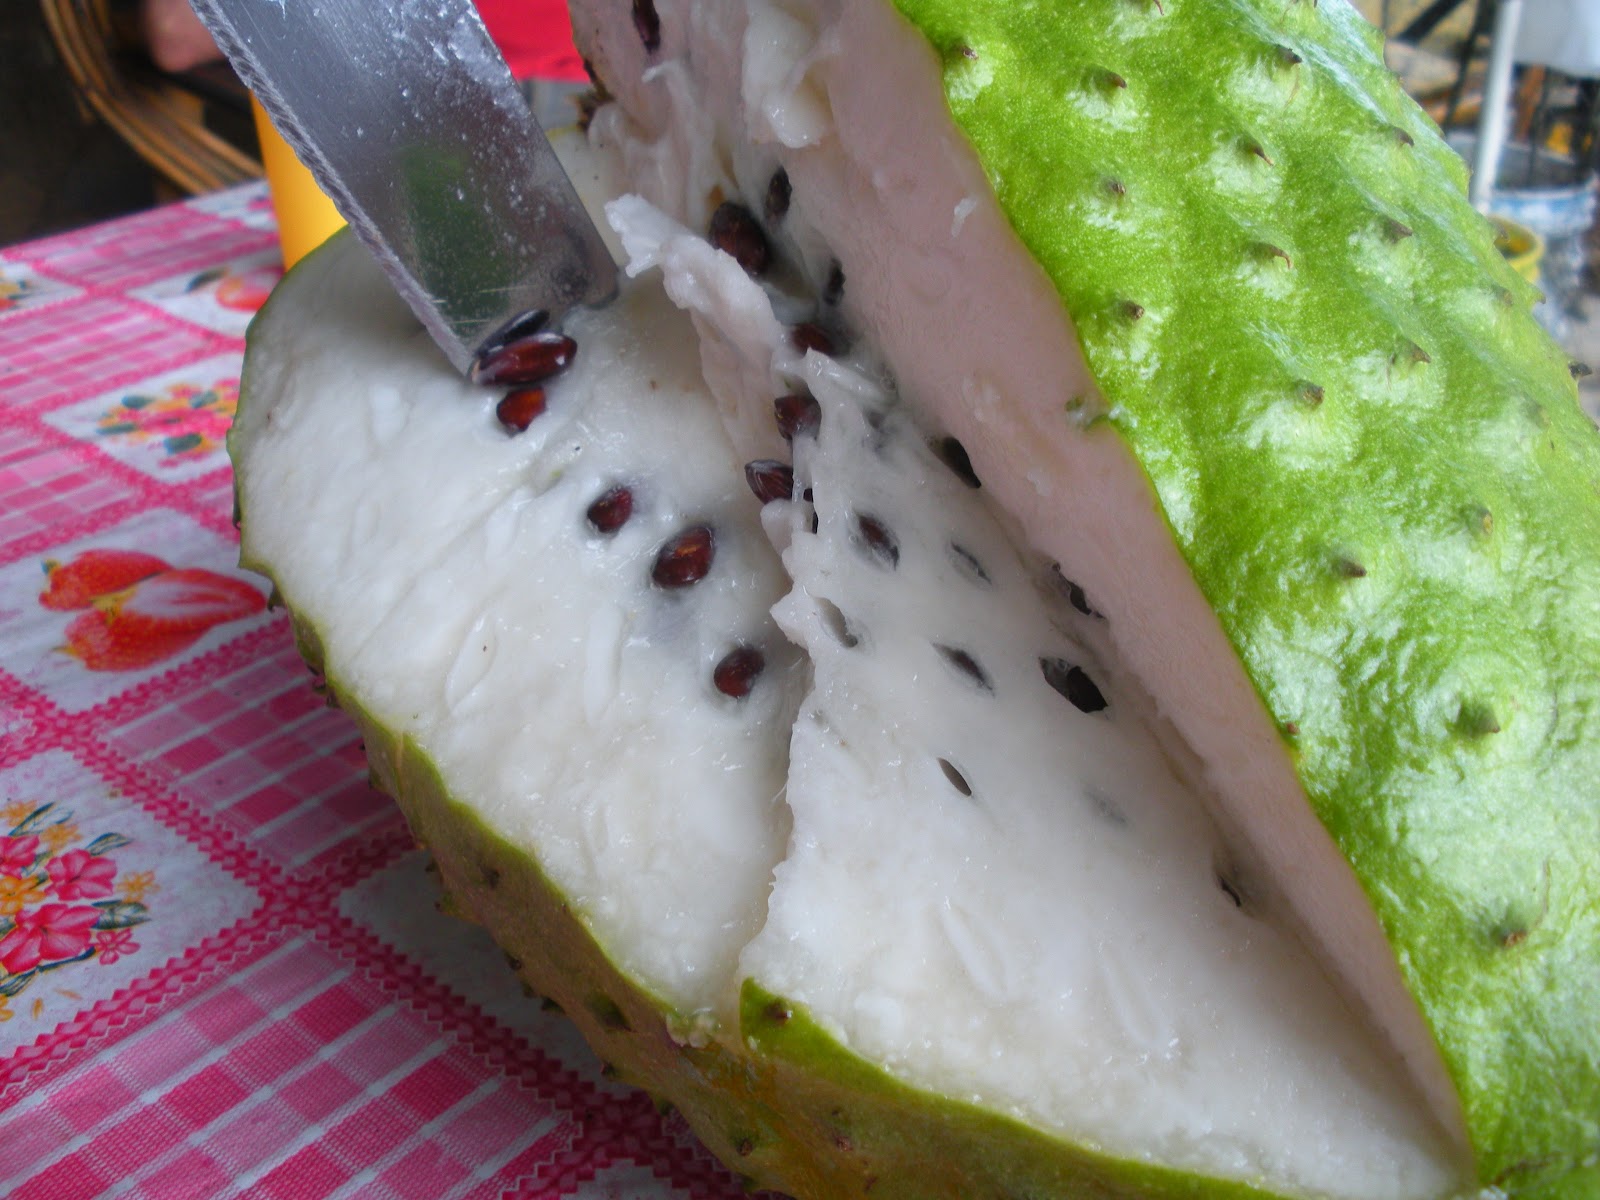
Edible stuff on the farm....
peppercorn

Katuk....a perennial with leaves and pods that are amazing in salad! 

Okinawa spinach...a perennial that's, again, super tasty in salad.

Little sweet peppers. 

Cranberry Hibiscus. My favorite edible perennial. The red leaves look great in salad AND they have a tangy lemony flavor. 

Star fruit. 

Manzana de Agua. Water Apple. Tastes like a super crunchy, super juicy little apple.